Wednesday, 30 April 2014

Photography: It's Bokehlicious! Depth Of Field For Your Android Phones! (Android 4.4+ KitKat)


Pro-DSLR-like depth of field at your fingertips
Image by Carol Yip
Animated by Locky's English Playground

Google is one of the nicest companies in the world! Like Tesla, they are always going forward and striving for the best for their customers!

Recently, Google has updated their Google Camera app which allows you to match HTC's Duo Camera System! With this app, you can take photos with an adjustable depth of field (DOF) at any time!

Image from Google Play

Here's the description:

Google Camera snaps quick and easy photos and videos, and has creative picture modes like Photo Sphere, Lens Blur and Panorama.
Features
• Photo Spheres for immersive 360ยบ views
• Lens Blur mode for SLR-like photos with shallow depth of field
• Panorama mode with high resolution
• 100% viewfinder for getting the maximum resolution from the sensor (no dropped pixels)
• Updated UI that gets out of your way and is centered on an extra large capture button
• Works on phones and tablets running Android 4.4+ KitKat

This lens blur works well with close-up objects,

With 50% blur
Image by Locky's English Playground
as well as with objects at within hands' reach.

With 100% blur
Image by Locky's English Playground
The app comes with a slider for you to adjust the amount of lens blur you desire,

Focused on the tumbler
Image by Carol Yip
and of course, an adjustable focal point so that you can choose which object you want to focus on, whether they are objects at the background,

Focused on the red bean green tea frappucino
Image by Carol Yip
or objects in the foreground.

Quality settings page
Image by Locky's English Playground
To begin using the app, you are advised to go to the settings to take a look. All settings should be have been optimised according to your phone's hardware specification, still you can make changes to it as you wish, one of which might be the Lens Blur Quality.

Step 1: Take a clear photo with Lens Blur
Image by Locky's English Playground
To start, run the app which you have downloaded from Google Play and choose Lens Blur by swiping the left black boarder from left to right,

Step 2: Move phone upwards to create initial lens blur
Image by Locky's English Playground
Then, take a photo of the objects you want. After that, the app will prompt you to "Slowly raise your device. Keep subject centred." You might have to try several times to get used to it.


Processing duckies
Image by Locky's English Playground
 If successful, you'll see a flash and the image will be proceeded in the background.

Process complete, time to fine tune
Image by Locky's English Playground
Swipe the right boarder from right to left to go directly to the photo or go to your Gallery on the phone and you'll find the photo there. On the photo, you want to click the second button which looks like a shutter to open up the blur adjustment page.

Image by Locky's English Playground
 Usually I'll start with the slider at maximum blur then work backwards to get the best look.

Image by Locky's English Playground
 Then you can try to choose different focus points to get the best out of your photos.

Image by Locky's English Playground
The best part is, you can always return to the photos to re-adjust them at any time after the photo is taken, just in case you feel regret after several days or weeks.

So, let's be pros!!!!


Resources:
Google Camera Lens Blur Demo @ Locky's English Playground YouTube
http://youtu.be/XyPCl6AmHog

Google Camera @ Google Play
https://play.google.com/store/apps/details?id=com.google.android.GoogleCamera

[APK] Google Launches Chrome Remote Desktop for Mobile, Google Camera Appears in Play Store for All Devices @ XDA-Developers
http://www.xda-developers.com/android/apk-google-launches-chrome-remote-desktop-for-mobile-google-camera-appears-in-play-store-for-all-devices/

Extract Depth Map and Create 3D Parallax Images from Pics Taken with the Latest Google Camera App @ XDA-Developers
http://www.xda-developers.com/android/extract-depth-map-and-create-3d-parallax-images-from-pics-taken-with-the-latest-google-camera-app/


Monday, 28 April 2014

Technology: Installing KitKat 4.4.2 stock ROM to International Galaxy Note 2 GT-N7100 through Odin!

Official Android KitKat 4.4.2 on Galaxy Note 2 (Wallpaper not included)
Image from Locky's English Playground
Recently, Samsung has released its latest N7100XXUFND3 official Android KitKat 4.4.2 firmware update for the Galaxy Note 2 GT-N7100, and I could not wait to install it onto my dad's Note 2, and here's how fast the phone gets after installation!


Initially, I was planning to sell it and get a new phone, but now, I'm going to keep it as spare. Almost forgotten how good this phone really was!

The installation is simple, need no rooting and no data will be lost in the process.

Installation Guidelines:
  1. Put the phone into Download Mode (do start watching from 4:35), connect the USB and then run Odin


  2. Unzipped the downloaded ROM.
  3. At AP, choose the unzipped ROM and wait for the processing to complete.
  4. When the Start button is ready, press that.
  5. Wait for the phone to do its thing, get a cup of coffee and muffin.
  6. After 5 minutes or so, your phone is ready!


Resources:
How To Get Into Download Mode  @ YouTube
http://youtu.be/b1koIpRfs7s?t=4m35s

Android KitKat 4.4.2 on Galaxy Note 2 GT-N7100 @ YouTube
http://youtu.be/RAotCaj9Hqs

N7100XXUFND3 official Note II firmware @ XDA-Developers
http://forum.xda-developers.com/showthread.php?t=2730465

Thursday, 24 April 2014

Vocabulary & Slang: Confusing Words in English feat. -Graphs, -Phones and -Nyms

Image from BuzzFeed
Another simple day for me. Just watch and learn.


By the way, examples in the last video, Words You're Probably Mixing Up -- Similar-sounding words you're probably using wrong, such as

  1. aural - oral
  2. discreet - discrete

have same pronunciation but different meanings, therefore, they are homophones, whereas, the following are minimal pairs because they are different in one phoneme,

  1. ascend - assent
  2. prescribe - proscribe

Venn diagram showing the relationships between homographs (green) and related linguistic concepts
Image from Wikipedia

As for "restful - restive", they are sort of antonyms, meaning they are words of opposite meanings, whereas "flammable - inflammable" are synonyms, meaning they are words of similar meanings.

Lastly, "ingenuous - ingenious", they are different in spellings, different in pronunciation, different in meanings, outside of the minimal pairs region, so, they are just confusing words.

Just in case you wanna meet some faux amis, do check out Culture & Usage: "Lufsig", False Friends & Bad Words.


Vocabulary:
peen
tittle
nurdle
dongle
angina
diphthong
annals
pusillanimous
futtock
coccyx
mastication
kumquat
sexton
dictionaries
brucschetta
charcuterie
gnocchi
quinoa
beignet
endive
anise
gyro
cognac
espresso
prosciutto
pho
paella
bon appetit
aural
oral
ascend
assent
prescribe
proscribe
restful
restive
ingenuous
ingenious
discreet
discrete
flammable
inflammable
homophones
minimal pairs
antonyms
synonyms
faux amis


Resources:

Culture & Usage: "Lufsig", False Friends & Bad Words @ Locky's English Playground
http://lockyep.blogspot.hk/2013/12/culture-usage-lufsig-false-friends-bad.html

13 Words That Sound Sexy But Actually Aren't @ YouTube
http://youtu.be/iTSXGanCd7c

Words You're Probably Mixing Up @ YouTube
http://youtu.be/KC5DSkrhYFM

13 Foods You're Pronouncing Wrong @ YouTube
https://www.youtube.com/watch?v=Hu9AEX0LHXQ

Homophone @ Wikipedia
http://en.wikipedia.org/wiki/Homophone

Minimal pairs @ Wikipedia
http://en.wikipedia.org/wiki/Minimal_pair


Tuesday, 22 April 2014

Cooking & Food: 3-Step Home-made Very Yummy OK Baby Back Ribs!!!


Home-made Very Yummy OK Baby Back Ribs
Image from Locky's English Playground
"Ohh!!! What do you call this rib?"
"You wanna learn? I'll teach you then."


Some ribs
Image from Locky's English Playground
Yesterday, I decided to try making my own barbecue baby back ribs for the first time of my life, and so I bought some nice ribs at a supermarket discount day.

Colman's OK Fruity Sauce and Select Pure Honey
Image from Locky's English Playground
To cook this slab of ribs, all you need are some barbecue sauce and honey. Because I can only find Colman's O.K. fruity sauce (which is in fact brown sauce), I'll use just that. As for honey, I use the best!

Add half a bottle
Image from Locky's English Playground
Step 1: Add a generous amount of OK fruity sauce to the ribs and spread it over both sides of the meat. Let it marinate for about 3 hours.

Marination time!
Image from Locky's English Playground
Step 2: Put the ribs in the middle level of an oven, use both upper and lower heating at 250°C for 15 minutes a side.

Cooked!!!
Image from Locky's English Playground

Step 3: Use a knife to cut off a piece to see if the meat has been fully cooked, if it is, add honey over the top and transfer it to a nicer plate.

Transferring to a better-looking plate
Image from Locky's English Playground
Ribs fully cooked
Image from Locky's English Playground

That's it to my guide of a 3-Step Home-made Very Yummy OK Baby Back Ribs! Enjoy!!!
Beautiful colours
Image from Locky's English Playground
Beautiful colours!!!

From another angle
Image from Locky's English Playground
Sexy look!

Image from Locky's English Playground
Tender meat!

Image from Locky's English Playground
Rich in taste!

Can't get easier than this!


Resources:
Medical, Health & Fitness: Which Honeys and Manuka Honeys Are The Best? @ Locky's English Playground
http://lockyep.blogspot.hk/2013/08/medical-health-fitness-which-honeys-and.html

Sunday, 20 April 2014

Photography: How To Remove Dust And Fungus From Inside Of Your Lenses

How to get rid of that little bugger under your lens glass?
Image from Locky's English Playground
Yesterday I took out my Canon EOS 7D again and realised that there is a little white spider on the lens glass, upon further inspection and consulting my wife, it may very well some fungal actions happening from inside. This is a terrible news because the L lens costs HK$8000+ when I bought it AND its warranty has already expired. Thus my only option is DIM -- Do It Myself.

The internet is a marvellous place, after a quick search I found an excellent guide which taught me how to get the job done.

Cleaning my Canon EF 24-105mm f/4L IS USM Lens

Here's what I have used
Image from Locky's English Playground
To begin with, I took out an inexpensive 32 in 1 screwdriver set with tweezers which I bought from Japanhome (highly recommended), a rubber air blower, lens cleaning cloth and the must have all-purpose Isopropyl alcohol (remember how it saved my seawater-damaged Galaxy S2)?

Makeup ring lift with finger and tweezers
Image from Locky's English Playground
First, I removed the makeup ring with the tips of my fingers easily. It is basically a simple sticker.

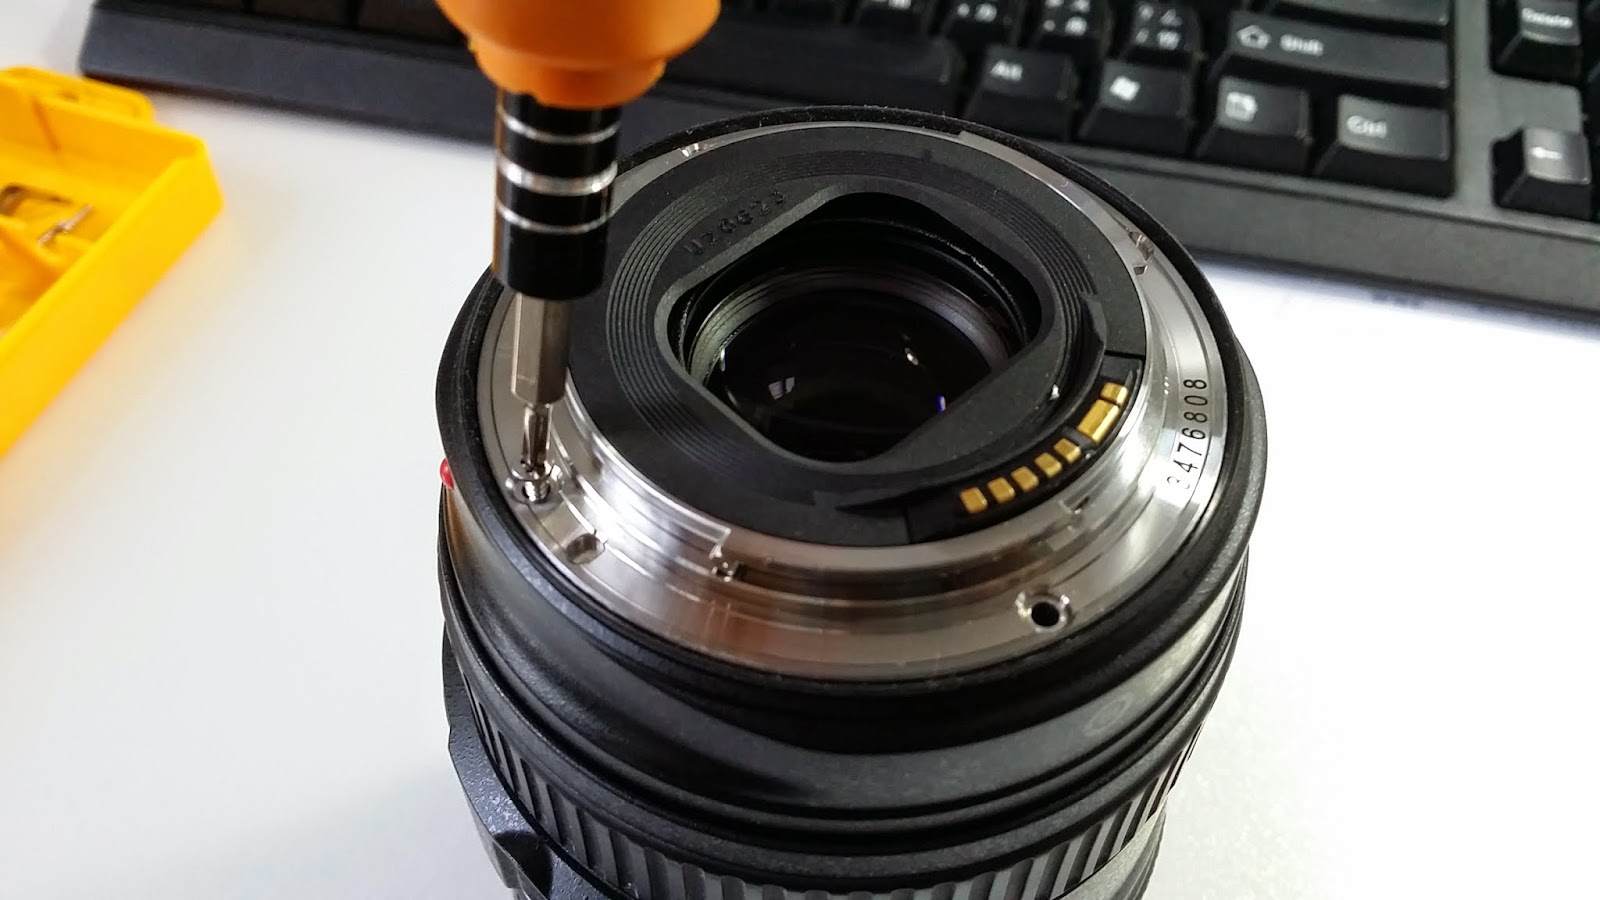
6 screws underneath
Image from Locky's English Playground
Hiding underneath are 6 small screws. Simply remove them.

Unscrewed and tweezers for the lifting
Image from Locky's English Playground
Then use your finger nails or tweezers to turn the front glass ring to one side.

glass removed with the little bugger now exposed
Image from Locky's English Playground
Turn the lens upside down and catch the front element with your other hand, and wah la! Here's the little fungal bugger!!! Kill it with a little alcohol and then use the lens cleaning cloth to wipe away any dust, and dry the glass with the rubber air blower before putting everything back into place.

Goodbye fungus, hello clean lens!
Image from Locky's English Playground
What I get now is a piece of beautifully clear glass!

L Lens revitalised!
Image from Locky's English Playground
Welcome back my revitalised L lens!!!


Cleaning my Canon EF 50mm f/1.8 Mk II
Fungus again!!!
Image from Locky's English Playground
After the success I had yesterday, I took a look at my Canon EF 50mm f/1.8 Mk II and I found yet another fungus under the glass! This time though, it is not the front element, but the back. After searching through YouTube, I found an excellent video and so I followed it closely.

2 microscrews on the side
Image from Locky's English Playground
First, I removed the 2 microscrews on the side, 

Turn the lens and off it comes
Image from Locky's English Playground
Then I push the contact down and use a tweezers pop the cap out. As for the rear element, hold onto the glass and turned anti-clockwise using a little force, soon enough it will come out in no time!

The feet of the lens are not regular and are of different angles
Image from Locky's English Playground
Do the fungal removal as clean as you want, 

rear lens in place waiting for the turn
Image from Locky's English Playground
When you do place the rear lens back into the socket, take note that the feet are spaced out unevenly and are of different sizes, meaning that there is only one way to fit the rear, don't rush.

Screws the contact back before placing back the cap
Image from Locky's English Playground
Before placing the cap back on, screw the contact back in place first using those two microscrews.

Clean and clear!
Image from Locky's English Playground
Pop the cap back on and there you have it!!!

Do check out the video I followed below! Great stuff!


If you also have a lens which you want to clean, you can also visit How to Do DIY Dust Cleaning Surgery on 6 Popular Canon and Nikon Lenses at PetaPixel to see if you can find the guide to cleaning your lenses, and as always, Google and YouTube are your friend.


Extra Time:

Sometimes, mistakes are not all that bad! That's because before I did all that I mentioned above, I actually watched the following video and I tried to follow.


Bummer 1
Image from Locky's English Playground
With my L lens, I actually unscrewed the the rear.

Bummer 2
Image from Locky's English Playground
I reached the part I even unscrewed the microscrews, got at least 3 sections of my lens loose before I got stuck because I couldn't remove the cap. It was then I realised I have to look elsewhere for another method. 

Lucky that I failed, if not, I would have removed everything part of the lens just to realise that all I had to do was to start from the front. Would have taken hours to put the whole thing back and be very lucky if it still works.


Another mistake I made today is that I found another YouTube video on dissembling the Canon EF 50mm f/1.8 Mk II,

Bummer 3
Image from Locky's English Playground
and I got to the part as shown above, almost removing my buttons. 

Lucky that I stopped to think again! Had I not, I will probably break the lens.

The lesson learned here is that I should never look up the keyword "dissemble" and should go for "cleaning dust" instead.


Vocabulary:
bugger -- (n)[C] UK offensive a silly or annoying person:
revitalise -- (vb) [T] (UK usually revitalise) to give new life, energy, activity, or success to something:


Resources:
How to Do DIY Dust Cleaning Surgery on 6 Popular Canon and Nikon Lenses @ PetaPixel
http://petapixel.com/2013/05/16/a-few-easy-lens-dustings/

Technology: My First Galaxy S2 Surgery -- Sea Water Damage S2 Fixed!! @ Locky's English Playground
http://lockyep.blogspot.hk/2013/02/technology-my-first-galaxy-s2-surgery.html

Canon 24-105 USM L IS Reparatur / Repair / Disassembly @ YouTube
https://www.youtube.com/watch?v=mRUTrNoDD1M

How to Disassemble the Canon EF 50mm f/1.8 II Lens @ YouTube
https://www.youtube.com/watch?v=15tUQhVMScc

Canon EF 50mm 1.8 Lens Cleaning without damage @ YouTube
https://www.youtube.com/watch?v=ZHFMzKpQwMc

http://dictionary.cambridge.org/dictionary/british/bugger_1?q=bugger+
http://dictionary.cambridge.org/dictionary/british/revitalize?q=revitalised+

Saturday, 19 April 2014

Cooking & Food: Hong Kong-Style Macaroni With Grilled Duck Meat In Duck Soup (And More) !


Peking Garden's Peking Duck
Image from FeedTheTang
Happy Easter everyone! Hope you are enjoying health and time with family.

Image from FeedTheTang
Ever wonder what you can do with what's left behind after an amazing peking duck dinner with the family? Last week, we went to Peking Garden at Cityplaza and had a yummy duck for the night, and every time we do we always request for a to-go with the "duck cage", that is the remains of the duck after having all the slices removed.

The cage has a lot of potential and I'm gonna share a couple of possibilities with you so that no food will be wasted.

Duck meat
Image from Locky's English Playground


First, you want to debone the entire duck cage. This is a very easy step, just put on some plastic gloves and use your hands. Usually I will start with the wings and legs by removing them as a whole, and then work on the rest of the meat on the cage body. Once done, put that away for awhile.

Post-processed duck cage
Image from Locky's English Playground
You don't want the neck and the butt because there is no meat there, and also, you can chuck away the skin because it is too oily. What's left will not be wasted at all.


In you go!
Image from Locky's English Playground
Because the best way to handle it will be to use it for cooking soup. I suggest 2.5 litres of water for one duck cage. Since I have two, I made it 5 litres.

Cooking is done in the vacuum pot for hours
Image from Locky's English Playground
I use a vacuum pot for this soup because it saves me gas, time and money. After high flame boiling for about 15 minutes, I will let the pot to do the rest for the hours to days to come.

Yellow liquid fat / oil on surface.
Image from Locky's English Playground
Since you need to reheat the soup every half a day, it is best for you to remove the excess fat that you see floating on the surface of the soup.

Chicken and dry fish, why not?
Image from Locky's English Playground
You may want to add anything extra as you like, such as the chicken you couldn't finish or the dry fish that has been sitting in the cabinet for months. The key is that you need to add a tablespoon of chicken powder and some salt.

After 4 repetitions of reheating and boiling, your broth is done! Now return to the duck meat.

Microwaved and fried! Yum!
Image from Locky's English Playground
Usually the duck meat has been sitting in the fridge for a day or two, so I will usually use microwave to reheat it to make sure the meat is soften before putting it to a pot or a wok for frying. The key is to add salt to bring out the aroma as the meat does smell excellent but is also quite bland. That's because when you have that dish in the restaurant, they gave you some rich flavour sauce to go with it and so the duck meat need not be particularly salted.

Image from Locky's English Playground

After you have done with the frying, don't be silly and start washing the pot or the wok,

Product of "2 days" of cooking
Image from Locky's English Playground
use the pot to reheat the duck soup, this way, you are adding extra flavour to the soup before it is served.

Duck meat on ho fun (rice fettuccini)?
Image from Locky's English Playground
To go with the meat, some people like ho fun (Chinese rice fettucini),

Image from Locky's English Playground
or you can have your Hong Kong-style macaroni,

Duck soup macaroni with duck?
Image from Locky's English Playground
it is really up to you! Just pour in the soup and you have an excellent lunch or supper which probably costs you HK$50 if you have it at a restaurant, that is, if you can even find one that serves it.

Image from Locky's English Playground
You can even use my pork chop recipe if you have extra duck soup left, or ...

Duck soup rice anyone?
Image from Locky's English Playground
you have heard of Hainan chicken rice, right? How about some home-made duck soup rice? So unique that you've got to try it! You will need to condense the soup by 50% before you use the soup for cooking rice though.

For more easy recipes, do visit Locky's English Playground's Cooking page.


Vocabulary:
ho fun (Chinese rice fettucini) -- see Chinese Noodles @ Wikipedia
supper -- (n)[C or U] a main meal eaten in the evening, or a small meal eaten in the late evening:
broth -- (n)[U]  a thin soup, often with vegetables or rice in it:

Resources:
Cooking: Locky's Home-made Pork Chop Bun @ Locky's English Playground

Locky's English Playground's Cooking page @ Locky's English Playground

Fettucine @ Wikipedia

Chinese Noodles @ Wikipedia